
Lumographe guide
Learn one action at a time.
This guide follows the buttons in the app. Every procedure tells you where to go, what to tap and what you should see next.
Getting started
Build your first show
At the end of this procedure, one fixture is patched, adjusted and stored in a Scene.
- Create the project
Tap New, enter a clear name, then open the project.
- Add a fixture
Open Patch, find the model and choose the mode shown on the fixture.
- Check the channels
Choose the universe and address, then open the DMX Simulator.
- Build the look
In Faders, raise Intensity and set CCT, color or Pan/Tilt if the mode provides them.
- Store the result
Open the Scenes panel, tap +, enter a name and choose an icon.
- Enable output when ready
In Connections, choose Art-Net or sACN, then enable DMX Output.
Result Tap the Scene. Every stored control should return using the selected fade time.
Organize
Projects and account
A project contains the Patch, Scenes, FX, Timelines, Sequences and show settings.
Create or open a project
- Tap New on the home screen
Use a unique name. Add the location or date when you keep several versions of one show.
- Tap a project card to resume
Lumographe restores the stored values and content.
- Open the card menu to manage its file
You can rename, duplicate, export or delete it.
Share a project without a live session
Choose Export, send the file, then use Import on the other device. For simultaneous control, use Collaboration.
Prepare fixtures
Patch and the Lumi library
The Patch links a real fixture to its exact DMX mode, universe and address.
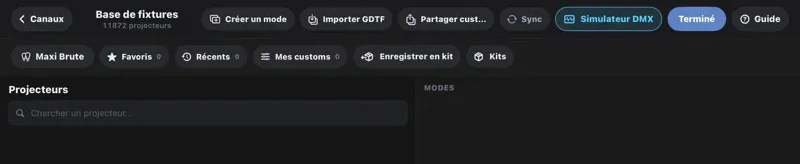 123
123- Create Mode when the profile is missing.
- DMX Simulator checks the channels.
- Customs and kits store your own profiles.
Add a fixture
- Search for the manufacturer and model
Use the exact name printed on the fixture. The main library is called the Lumi Library.
- Choose the exact mode
Compare its real name and channel count with the fixture menu.
- Filter a long list
Combine 8-bit, 16-bit, CCT, RGB, HSI, XY, pixels, version and Fixture Control filters.
- Set universe and address
Next free address avoids overlaps. For a batch, check quantity and spacing.
- Confirm and test
The mode enters the project. Open the Simulator before enabling real output.
Create a missing mode
Start with common controls: Dimmer, CCT, Tint, Red, Green and Blue. Then add Pan/Tilt, Zoom, Focus, Fan, Speed, Reset and every function listed in the DMX manual. The preview shows the resulting faders.
⚡ LocateBriefly pulses the physical fixture, then restores its previous value.
Pixel modeCheck the pixel count and master controls. The master must keep every global control exposed by the mode.
Live control
Control with Faders
Each column represents either a fixture or one type of control, depending on the active sort.
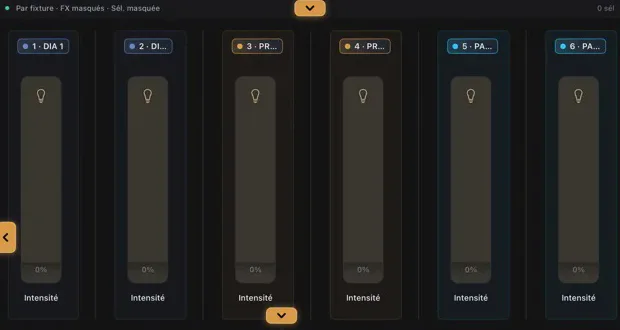 12
12- The top bar changes sorting and filters.
- The handle opens the Scenes, FX, Timeline and Sequence pads.
Adjust a fader
- Drag vertically
The value bubble stays attached while the bank scrolls horizontally.
- Tap the value for precision
Pan/Tilt can show degrees when the mode range is known.
- Long press Pan or Tilt
The XY pad opens. Visible faders for the same fixture remain interactive.
Understand the controls
IntensityThe mode Dimmer, or a virtual RGB dimmer when the fixture only has Red, Green and Blue.
CCT and TintColor temperature and green/magenta correction.
ColorColor wheel, HSI, XY or direct channels, depending on the mode.
Pan/TiltA compact double fader that still uses the fine 16-bit channels.
Fixture ControlFan, speed, reset and mode-specific functions with their real names.
See what is driving a control
- FX Builder
- FaderFX
- Timeline
- Sequence
The outline surrounds the affected control, not the whole fixture. In Collaboration, a small user color identifies the device holding that control.
Group control
Cells, Table and Layout Grid
All three views control the same fixtures. Only the presentation changes.
 123
123- Sort by fixture or control.
- Choose Live color or Patch color.
- Switch between Pillbox and Table and set the size.
Use Table view
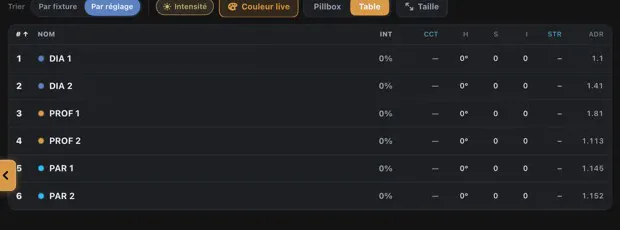
- Choose Table
The dense view displays available Intensity, CCT, color and address columns.
- Drag a value
The value follows your gesture. A long press opens color or source controls.
- Enable Quick Selection for a batch
Swipe across rows or cells. With Quick Selection off, the same gesture scrolls the list.
- Create a group
Select fixtures, then tap Create Group, or drag them into an existing group.
Understand multi-pixel fixtures
The master shows the fixture number and pixel count. It keeps every global mode control. Pixels appear as 7.01, 7.02, 7.03, and so on. Fold the master to save space.
Store
Create and recall Scenes
A Scene stores a look. Its card can show a name, icon, color, number or square photo.
Create a Scene
- Set the fixtures
Build the look in Faders, Cells or Table.
- Tap + in the Scenes panel
The add button follows the active pad, so make sure Scenes is open.
- Enter a name
The name can be edited later and appears on the card.
- Choose its visual identity
The first suggestions are Sun, Fire, Mountain, Rain and Moon. Show More opens the full icon library. Photos are cropped to a square.
- Confirm
The Scene gets a permanent number. An icon replaces the large number to avoid overlap.
Recall with a fade
Set the fade time, then tap the Scene. Every interpolated control should start and finish together. The History panel returns to an earlier state.
Edit several Scenes
- Enable Selection
Swipe across cards to add several Scenes quickly.
- Long press the selection
The panel applies shared actions to the whole batch.
Build a Scene Suite
Add Scenes in order, choose one global hold time or individual times, then enable Loop if needed. The blue handle resizes the panel without covering its text.
Create an effect
FX Builder
FX Builder creates named, reusable effects. FaderFX is a quick effect attached to one fader.
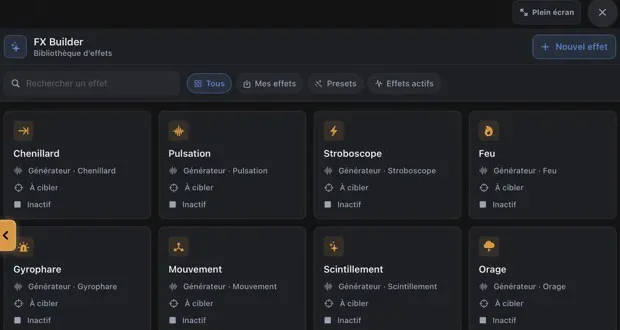 12
12- New Effect opens the generator list.
- Filters show all FX, your FX, presets or active FX.
Full example: create a Chase
This example moves one value from cell to cell. It also shows the difference between Console Value and Value from Effect.
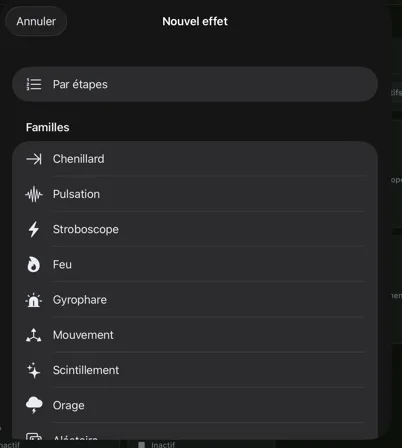 12
12- Choose Chase for a ready-to-adjust generator.
- Choose Step by Step to write each state yourself.
- Tap New Effect, then Chase
The effect cannot be saved until it has at least one target.
- Tap Choose in Cells
Select cells in playback order, then return to FX Builder.
- Set the Background Value
This value applies to cells the Chase is not painting at that moment.
- Set the Effect Value
This is the intensity, CCT or color applied to the active cell.
- Choose the source of each value
Console Value follows the current manual setting. Value from Effect uses a value stored in the recipe.
- Open color, intensity and temperature settings
These controls only appear when the selected cells expose them and the value comes from the effect.
- Run Preview
Use Play, Pause and Stop. Adjust target order, speed and direction.
- Name and save the effect
It appears in the library and FX Pad.
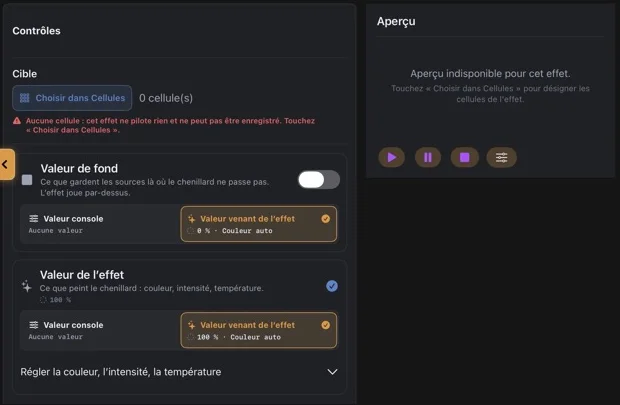 1234
1234- Targets and playback order.
- Background value source.
- Effect value source.
- Preview transport.
Create a step effect
- Choose Step by Step
Add states in playback order.
- Set every row
Time, dwell, level and light settings can use the console or a stored value.
- Preview and save
Converting an existing effect displays a loading screen while the copy is built.
Turn an FX, Timeline or Sequence into a fixture
This creates an automation fixture. It is not a DMX profile. It is a Lumographe source linked to the original item and shown in Faders, Cells, Table and the fixture list.
- Save the original item
For FX, open More Actions. For a Timeline, choose As Fixture. For a Sequence, open the … menu.
- Tap Export as Fixture
Enter a clear name. One linked fixture can be created for each source item.
- Choose exposed controls
Transport is required. Add Speed, Loop, Position or useful generator settings.
- Confirm the export
The source appears with an FX, TL or SQ badge and a different tint from physical fixtures.
- Control it like a fixture
Use its faders, Cell, Table row or control panel. Every action stays linked to the original FX, Timeline or Sequence.
FXMain OFF / ON switch. Available controls depend on the generator, including Speed, Depth, Direction, Phase, Groups or states.
TimelinePlay / Pause / Stop, plus Loop, Speed and optional Position.
SequencePlay / Pause / Stop, plus Loop, Speed and optional Position.
Save and share a preset
Choose Save as Preset in the FX actions. The preset enters your cross-project cloud library. You can also export it as a file for another user to import.
Record time
Record a Timeline
A Timeline records changing values: faders, CCT, color, movement, strobe, Scenes and automation.
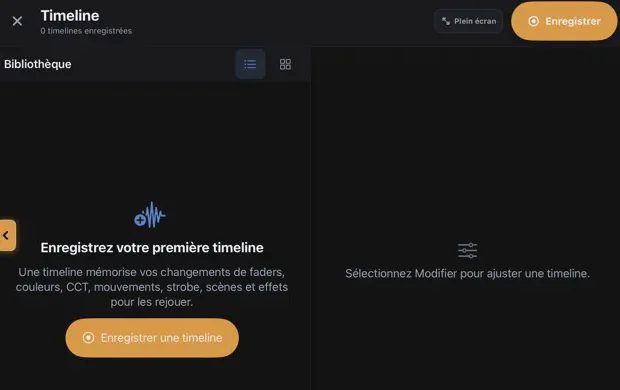 12
12- Record from the top bar.
- The empty state offers the same action.
Make a recording
- Tap Record
Choose whether currently playing FX, Timelines and Sequences should be captured. FX capture is on by default.
- Arm recording
The small graph starts moving as soon as a local or remote value arrives.
- Play the show
Move faders, recall Scenes or launch effects. A Scene recall records the resulting values, not only the Scene name.
- Tap Stop
Name the Timeline and check its duration.
- Play the clip back
Values should follow the same timing, including Scene fade times.
Record during Collaboration
When remote capture is enabled, the first movement on another device also starts recording. A Mac can run the show engine and output while iPads and iPhones remain control surfaces.
Add the Timeline to a Sequence
Choose Add to Sequence. Lumographe lists the available Sequences. If none exist, it tells you to create one first.
Export as a fixture In Timeline actions, choose As Fixture. See the full process under Turn into a fixture.
Arrange
Build a Sequence
A Sequence places several Timelines on tracks to build a long show or cue arrangement.
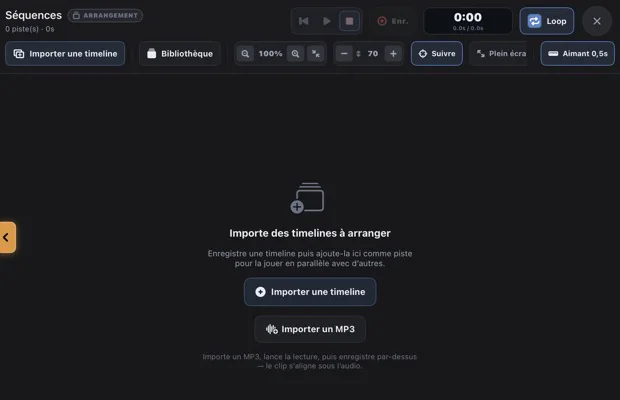 123
123- Import a Timeline or open the library.
- Transport and current time.
- Add a Timeline or MP3.
- Create or open a Sequence
The library provides a clear card for loading or recording a Sequence.
- Import a Timeline
Choose the clip and add it as a track. You can also import an MP3 as an audio reference.
- Place the clip
Drag it on the time ruler. Handles change its position and duration.
- Use the transport
Play starts, Pause keeps the position and Stop ends playback.
- Test transitions
Check overlaps and active automation before using the Sequence live.
Export as a fixture Open …, then Export as Fixture. Transport, Loop and Speed become source controls.
Movement
Movers and Tournesol
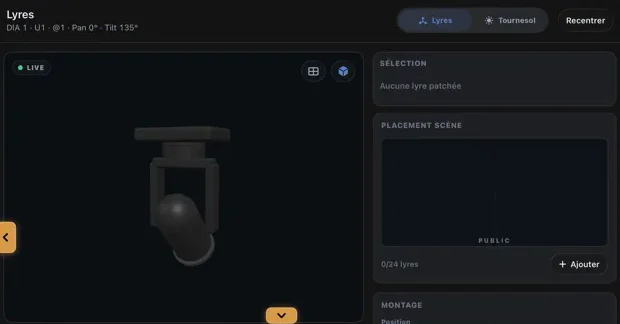
This view brings together placement, Pan/Tilt, 3D preview and optical controls.
 12
12- The 3D preview confirms orientation.
- Stage placement and mounting controls.
Control a mover
XY PadPan horizontally and Tilt vertically. Long press Pan or Tilt to open it.
Fine adjustmentUse small moves to correct aim without a jump.
BeamZoom, Focus, Iris, blades, Gobo, Prism and Strobe appear when the mode exposes them.
3D PreviewPinch to zoom. Recenter moves the camera without changing DMX.
Control a Tournesol
Choose one authority: Wi-Fi control or DMX control. Wi-Fi monitoring can remain active during DMX control. Solar Tracking sends its command to the PCB or dedicated DMX channel. Projector Reflection hides solar target controls that are not needed.
Real output
DMX and connections
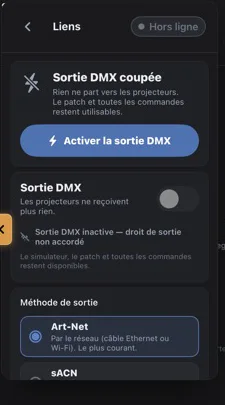
Patch defines the channels. Connections defines where those channels are sent.
 123
123- Enable real output.
- Enable or stop the stream.
- Choose the method.
Enable network output
- Open Connections
The panel slides out from the left without covering its handle.
- Tap Enable DMX Output
In standalone mode, routed universes are sent after real output is enabled. When an active Collaboration session is joined, per-universe assignments are set in Collaboration.
- Choose Art-Net or sACN
Art-Net works with most nodes. Use Unicast when the destination is known.
- Select the node and universe
Check its IP address and universe before enabling the switch.
- Check the Simulator
If preview moves but fixtures do not, inspect output, network, node and cabling.
Reconnect a known node
Lumographe remembers recently used nodes. After a disconnect, it first looks for the same device. If its address changed, run detection again and confirm the new destination.
Multiple devices
Share a project live
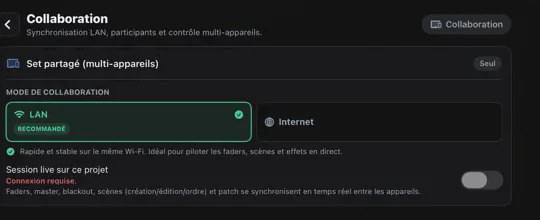
Collaboration connects iPhone, iPad and Mac. Every device keeps separate permissions, even when several devices use the same account.
 123
123- LAN on the same network.
- Internet for remote access.
- Enable the live session.
Start a LAN session
- Open Collaboration on the host
Choose LAN. Both devices must use the same network.
- Enable Live session on this project
The QR code appears automatically under the Add a device card. It encodes the selected LAN transport.
- Join from the other device
Tap Join a set by QR, then scan the code. The project opens automatically.
- Wait for the connection
The other device must appear under Connected Devices.
- Assign output per universe
Under DMX universes sent by this device, claim only the universes this device should send. Use Send all universes to claim every universe or Stop sending all to release them.
- Make a simple test
Move one fader slowly. Its preview should move in real time on every device before you enable DMX output.
Start an Internet session
- Choose Internet on the host device
Both devices must be signed in to their accounts and have Internet access.
- Enable the live session
Open the correct project and enable Live session on this project. The QR code appears automatically under the Add a device card and encodes the Internet transport.
- Join from the other device
Tap Join a set by QR and scan the code. The scanning device fetches the project online, opens it and joins the Internet session automatically.
- Account for latency
Remote connection: latency can be high and variable. Use Internet to prepare or monitor a project, not for precise live control.
- Check the connection
Check Connected Devices, session state and latency before preparing or monitoring the project.
Assign DMX universes
- Open DMX universes sent by this device
This section shows which used universes are sent by the current device.
- Claim universes one at a time
Each device can claim a used universe. Another device can keep sending the remaining universes.
- Use the global actions when needed
Send all universes claims every universe. Stop sending all releases them all.
- Avoid competing claims
For the same universe, the newest claim wins. Check the assignment after any change on another device.
- Split output to match your setup
For example, this iPad can send U1 while another device sends U2.
Set permissions per device
- Set the role at member level
Viewer is for following the session, Operator for running it during the show and Editor for preparing or changing its content. The role applies to the member, not an individual device.
- Choose each device's scope
In its menu, choose Edit everything, Selected universes…, Selected sources…, Selected groups… or Read-only. Read-only is a complete scope, not a capability to combine.
- Set independent capabilities
For editable scopes, set Drive the show (scenes, FX, timelines), Edit scenes & structure (recordings), Control families… and Administer session separately.
- Grant administration explicitly
Administer session is an independent permission for each device, not a role.
Resume an interrupted session
- Restore the network first
For LAN, join the same local network. For Internet, reconnect the devices to their accounts and the Internet.
- Use the remembered session when offered
From Home or the session card, choose to resume or rejoin the session. You do not need a new QR code.
- Let Lumographe find the other member
On LAN, the app looks for the remembered session on the local network. On Internet, it checks that another member still holds the session.
- If no offer appears, reopen the project
Open the original project, choose its original LAN or Internet transport, then try to join again.
- Generate a new QR code only as a last step
Create a new code only after these checks. Check the project identity and Connected Devices before moving a control.
If the QR code does not appear
- Tap Retry
Wait a few seconds, then disable and enable the live session on the host project.
- Check the transport
For LAN, check that both devices use the same Wi-Fi network and allow Local Network access. For Internet, check that both devices are signed in and online.
- Generate a new QR code
Reopen the correct project, select LAN or Internet, then enable Live session on this project. The QR code appears automatically under the Add a device card.
Performance
Set up DJ Mode
DJ Mode combines Scenes, FX, Timeline and Sequence pads with performance faders.
- Add only useful pads
Empty modules should not take space in the grid.
- Choose List, Compact or Tiles
Cards, labels and transport stay readable as the pad gets smaller.
- Move and resize modules
Pads reorganize without overlap or cropping.
- Map physical controls
Open MIDI Learn, then map pads, transport and faders.
Adjust
Settings and diagnostics
Interface settings do not alter the light. Output settings should always be checked in the Simulator.
AppearanceTheme, text size and selection color.
PerformancePreview detail. Lumographe always keeps a visual representation.
MIDIDetected inputs, sensitivity and MIDI Learn.
AccountSign-in is required for output and Collaboration during Early Access.
DiagnosticsEngine, network, node and Collaboration stream state.
Map a control with MIDI Learn
- Connect the MIDI controller
Open MIDI and check its name under Detected Device. Move a control to see Connected · active.
- Enable Learn Mode
The panel shows key commands, Scenes and Timeline transports. Show More Settings opens the rest.
- Tap Learn on the target command
The row shows Waiting for MIDI or OSC. Only one command waits at a time.
- Move the physical fader, button or encoder
The next received message is assigned to that command.
- Test both directions
The hardware control should match the touch control. With Visual Feedback enabled, LEDs and motorized faders can follow Scene recalls.
Available MIDI Learn commands
You can map Master, Blackout, Full, Zero, Scenes, faders, Pan/Tilt, FX, Timeline and Sequence transports, DJ Mode pads and the DMX output kill switch. Controls with a MIDI marker can be learned directly on their surface.
PickupThe hardware fader must reach the on-screen value before taking over. This avoids jumps.
ScaleThe hardware movement is scaled from the current value.
No takeoverThe first MIDI value is applied immediately.
SensitivitySets the speed of relative encoders.
Tap the cross on one row to remove an assignment. Clear All removes every assignment in the active profile.
Read the DMX Simulator
- Choose the universe
Channels shows all 512 values.
- Choose Fixtures or Patch
Inspect one source at a time.
- Open Changes
Recently changed or unstable channels are easy to spot.
Understand
When several features drive one control
Lumographe combines control layers. The control outline identifies the layer currently driving it.
1Manual takeover
2Pixel Mapping
3FX Builder
4Timeline preview
5Recorded Timeline
6Sequence
7Scene or manual base
Example: a Timeline drives Intensity. When you take over that fader, Intensity follows your hand while the Timeline can keep driving Pan/Tilt or CCT.
Troubleshooting
Fix common problems
No fixture responds
- Check Master and Blackout.
- Open the Simulator. Do values move?
- Check universe and address.
- Check output, node and cable.
A fader looks locked
- Check its automation outline.
- With Console Value active, the fader must remain adjustable.
- Stop FX, Timeline or Sequence briefly to identify the layer.
The QR code does not appear
- Check Wi-Fi and Local Network permission.
- Tap Retry.
- Restart the live session.
- Sign out and back in if needed.
Remote preview is smooth but DMX stutters
- Diagnose output one universe at a time.
- For each affected universe, check which device holds its active claim.
- Use Ethernet or stable Wi-Fi on the device sending that universe.
- Use Unicast when the node supports it.
A mover travels the wrong way
- Tap STOP or Blackout.
- Check mounting, inversion and Pan/Tilt ranges.
- Test with a small amplitude.